Skull Stripping
 The first step in many MRI analysis sequences is the removal of extra-meningeal tissues from the MRI volume of the whole head. Brain Surface Extractor (BSE) operates using a Marr-Hildreth edge detector to find a boundary between the brain and the skull. Since the CSF space and skull are dark on a T1 scan, the edges between the brain and the scalp are relatively well-defined. However, these strong edges are often interrupted due to the finite resolution of the MRI acquisition and actual anatomical connections between the brain and the rest of the body, e.g. optic nerves, brainstem, etc. Thus, BSE uses mathematical morphological operators (erosion, dilation, etc.) to further enhance the result of the edge detection and provide better separation of the tissues. Additionally, the edge detection result is improved by the application of an anisotropic diffusion filter before the edge detection is performed.
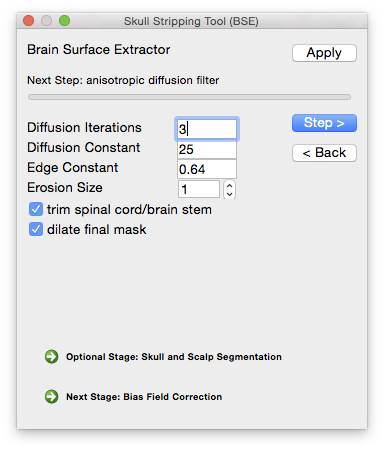
To perform the skull-stripping task in BrainSuite, use the BSE tool, which can be accessed from the menu item Cortex→Skull Stripping (BSE). This will display the dialog box shown to the right.
The BSE dialog allows you to step through each part of the skull-stripping process and adjust the parameters according to the intermediate results.
Scroll down for more details about each step.
Output Files
| Filename | Contents |
|---|---|
| filename_prefix.mask.nii.gz | Mask file |
| filename_prefix.bse.nii.gz | Skull-stripped MRI image (above mask file applied to the original scan) |
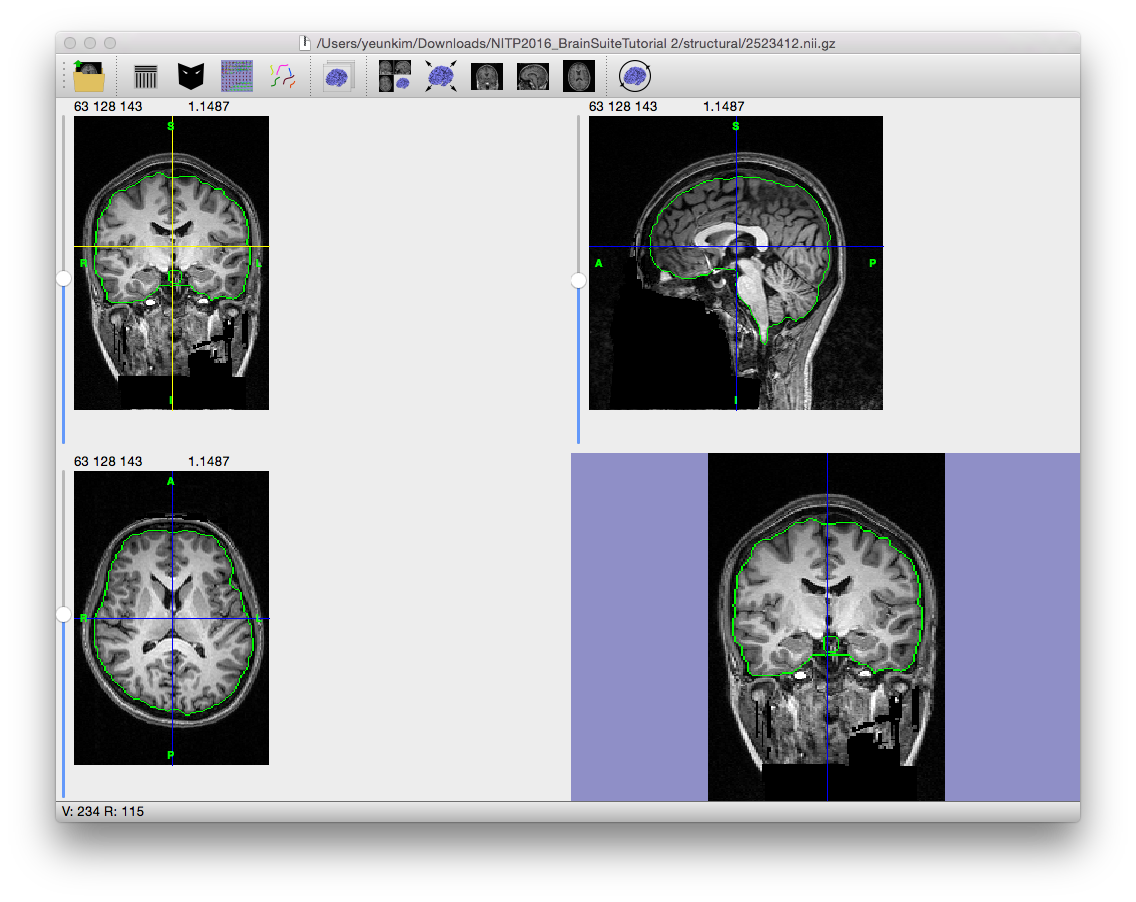
Example Result
Anisotropic diffusion filter
 The anisotropic diffusion filter (Gerig et al., 1992) will smooth lower amplitude differences in the image while retaining larger ones so that high-contrast edges are kept in the image while low-contrast ones are blurred. Note the smoothed appearance of the brain in the example image to the right.
Parameters
Diffusion iterations (typical range: 0–6) The number of times the diffusion filter is applied to the image. Additional applications will increase the blurring contained within the low-edge regions, but can also blur across edge boundaries.
Diffusion constant (typical range: 5–35) The edge diffusion constant controls the height of the edges that are retained; increasing the value of the diffusion constant increases the height of the edges that are filtered, thereby applying blurring more broadly to the image. Doing so will also increase the number of regions that are included in the brain mask.
Edge detection

A Marr-Hildreth edge detection operator that was extended to 3D (Sandor, PhD Dissertation, 1994) applies an initial Gaussian blur to the image, followed by a Laplacian operator. The zeros in the resulting image correspond to the detected edges. The Gaussian blur controls the scale of the edges that are found in the image. This is complementary to the initial anisotropic diffusion filter, which controls the amplitude of the edges.
- Parameter
Edge constant (typical range: 0.5–1.0) During the edge detection step, the scale parameter influences how wide an edge must be to be identified. With a large blurring kernel (i.e. a high value for the edge constant), the edge detector will blur very narrow edges and only find the larger structures in the image. Increasing the value of the edge constant decreases how many edges are found but, due to blurring, the localization of the edges is also reduced.
Finding brain

This step applies a series of mathematical morphological operators to the edge map found in the edge detection step. The first of these is an erosion with a 3D cross (diamond) element, which expands the edges (black voxels) into each voxel that shares a face with an edge voxel. The result is that small connections less than 2 voxels wide will be broken. For images with resolution of 1mm3, this corresponds to a 2mm structure – this is sufficient to erode most cranial nerves and to eliminate most noise-related connections between the brain and scalp portions of the MRI. With finer resolution images, it may be necessary to increase the erosion size to 2 in order to separate the brain. BSE then segments the eroded edge map into several connected regions that are bounded by the edges and analyzes these regions to select a candidate brain region based on (1) size of the connected region, (2) the average intensity of the connected region, and (3) the position of the centroid of the connected region.
- Parameter
Erosion size (typical values are 1 and 2) Determines how far to extend edge voxels into edges that share a face with them. The result is to remove small connections that are less than twice the erosion size, which in turn helps remove cranial nerves and detected connections between the brain and scalp due to noise in the image. In most instances this can be left at 1, but high-resolution images might necessitate an erosion size of 2.
Extract brain
The final step expands the mask in the region determined to be the brain in the previous step to include the full brain. If the mask does not look right (if it includes meningeal or other non-brain tissue, or is missing parts of the brain), try changing the parameters and running the skull-stripping process again or manually edit the mask using the mask tools.
- Parameters
Trim spinal cord/brainstem Select this option to trim the brainstem. If too much of the brainstem remains after using this option, the mask tools can be used to manually remove it. Dilate final mask Expands the final mask a few voxels out from the detected brain surface. Select this option to produce a more inclusive mask.
Tuning the BSE Parameters
Using the ADF will cause more voxels to be included in the brain mask. When selecting parameters, it is often useful to select the edge detector constant first, since this has more bearing on the boundary between the brain and scalp.
Adjust edge constant
- Start BrainSuite and load your image.
- Open the BSE tool.
- Set the Diffusion iterations to zero and press Next.
- BSE will advance to the Edge detection step.
- Adjust the Edge constant value to your initial attempt—some typical values include 0.6, 0.75, 0.8—and press Next.
- BSE will advance to the Finish Brain step.
- Press next.
- BSE will select the brain region.
- If it is obvious at this point that the parameter choice was not good, press the Back button until you are at the Edge detection stage, and repeat from step 5.
- Press the Next button.
- BSE will dilate and close the brain mask.
At this point, you should evaluate the result:
- Does the boundary include non-brain tissues?
- If so, then back up and adjust the edge constant.
- Is the boundary reasonable in most locations but is missing pieces?
- If so, then back up and apply anisotropic diffusion filtering prior to edge detection. Increase the diffusion constant and number of iterations to include more and more brain tissue. You need to check the results carefully to ensure that the diffusion isn’t so great that extra tissue is included. You can also use the mask tools to directly edit the mask.
Command-Line Usage
usage: bse -i input [optional settings]
example: bse -i input_mri.nii.gz -o skull_stripped_mri.nii.gz
Required Settings:
| Flags | Description |
|---|---|
-i <input filename> |
input MRI volume |
Optional Settings:
| Flags | Description |
|---|---|
-o <output filename> |
output brain-masked MRI volume |
-d <float> |
diffusion constant [default: 25] |
-n <iterations> |
diffusion iterations [default: 3] |
-s <edge sigma> |
edge detection constant [default: 0.64] |
-r <size> |
radius of erosion/dilation filter [default: 1] |
-p |
dilate final mask |
--trim |
trim brainstem |
--mask <filename> |
save smooth brain mask |
--adf <filename> |
diffusion filter output |
--edge <filename> |
edge map output |
--hires <filename> |
save detailed brain mask |
--cortex <filename> |
cortex file |
-v <number> |
verbosity level (0=silent) [default: 1] |
--norotate |
retain original orientation (default behavior will auto-rotate input NII files to LPI orientation |
--timer |
show timing |