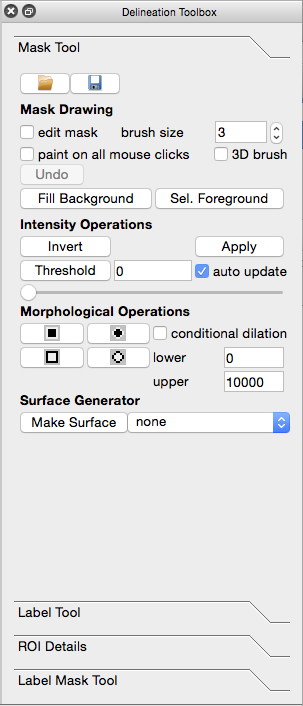
 In BrainSuite, masks are 8-bit volumes that represent where an object is within its 3D space. When BrainSuite segments the brain, it produces a mask representing the voxels that correspond to brain tissue and excluding non-brain tissue. The Mask Tool, located in the Tools menu, can be used to create, edit, or apply morphological operators to a mask.
To use these tools with an MR image:
- Load a volume file, either through the File menu or by dragging and dropping the file onto BrainSuite
- Open the mask tool (Tools→Mask Tool)
Create a mask
There are several ways to create a new mask automatically:
- Run the Skull Stripping Tool (Cortex → Skull Stripping (BSE)) to create a mask of the whole brain.
- Threshold the image, either by typing a value in the text box next to “Threshold” on the mask tool dialog or dragging the slider underneath to the desired value, and then clicking the “Threshold” button. Checking “auto update” will automatically update the mask each time the threshold value is changed. Once you are satisfied, be sure to uncheck auto-update so that you do not accidentally change the threshold value and the mask as a result.
Edit an existing mask manually
On a Mac, replace “Ctrl key” with “Cmd key (⌘)” in this section.
- Open a mask file (either through File→Open→Mask Volume… or clicking on the “Load Mask” button on the mask tool dialog)
- Check the “edit mask” box on the mask tool dialog
- To add an area to the mask, hold down the Ctrl key and left-click and drag the mouse to paint the additional areas.
- To remove an area from the mask, hold down the Ctrl key and right-click and drag the mouse button to erase an area from the mask.
- Alternatively, check the “paint on all mouse clicks” button on the mask tool dialog to skip using the Ctrl key and instead simply use left- and right-click.
- To make the brush larger or smaller, change the brush size value on the mask tool dialog
- To paint or erase in the coronal, sagittal, and horizontal planes at the same time (i.e. use a roughly spherical brush instead of a circular one), check the “3D brush” box on the mask tool dialog
- When you’re finished, either click “Save Mask” on the mask tool dialog or click File→Save Volume→Mask Volume to save the mask. Note that this saves only the mask file, not the mask file applied to the open MRI volume.
- To apply the mask to the open MRI volume, click “Apply” on the mask tool dialog under “Intensity Operations”. Then, click on File→Save Volume→Primary Volume to save the masked MRI volume.
Other operations
- To invert the mask (i.e. include all of the currently excluded areas and vice versa), click on the “Invert” button
- To dilate (expand) the mask, click on either “D[]” to dilate the current mask with a cube or “D<>” to dilate the current mask with a 3D diamond. To expand the mask only into voxels with certain intensities, check “conditional dilation” and set the “Min” and “Max” values to the interval desired.
- To erode (shrink) the mask, click on either “E[]” to erode the current mask with a cube or “E<>” to erode the current mask with a 3D diamond.
- “Fill Background” will fill any contained gaps or holes within the main component of the mask.
- “Select Foreground” reduces the mask to its largest connected component. This is useful for removing excess brainstem, for example: in the axial view, move to the slice right below the most inferior slice in which you want to include brainstem and erase it from the mask, then choose “Select Foreground” to remove the rest of the now disconnected brainstem.
- To generate a rough 3D surface representative of the mask’s shape, click “Make Surface.” The created surface will appear in the Surface Viewer window.