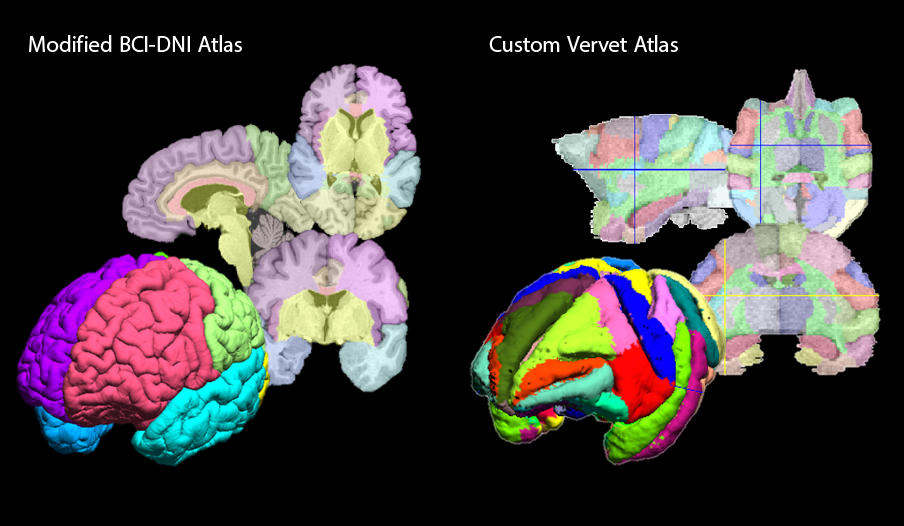
Examples of custom atlases prepared for use by SVReg.
Custom Atlases
BrainSuite users can create custom atlases that can be used by SVReg to perform registration and labeling of MRI data. This process uses the svreg_make_atlas tool, which is part of the SVReg package. Users have the choice of either modifying one of the existing atlases prepackaged with SVReg or creating a new atlas from user-specified data. Some of the reasons for creating custom atlases include:
- Modify existing atlases to combine or subdivide existing regions of interests.
- Label regions of interest that are not defined in existing atlases.
- Adapt existing external atlases for use in SVReg.
- Use their own data as an atlas. For example, a user may choose to use a representative subject from a study to co-register other subjects using SVReg.
- Use BrainSuite and SVReg to register and label non-human data.
- Generate intra-subject deformation maps for longitudinal studies.
Steps for Creating a Custom Atlas
File Preparation
- Creating an atlas from a new MRI: If you are creating your custom atlas from a new set of MRI data, you must first process your dataset using the BrainSuite Extraction Sequence and SVReg. This will generate a set of output files, including labeled surfaces and volumes, which are used to construct the new atlas. These output files must be placed in a single directory before running that svreg_make_atlas tool.
Note: svreg_make_atlas reads several outputs from the BrainSuite Extraction Sequence and SVReg. If there are missing files, the module will report the missing files and terminate the process. - Modifying an existing atlas: Copy the atlas directory that you wish to modify, e.g., the BCI-DNI_brain_atlas folder located in the SVReg directory, to a new location.
- The basename of the MRI file used for the atlas is used to determine the names of the other files in the atlas package. For the atlas you are creating, we refer to this name below as subbasename. For example, the BCI-DNI_brain_atlas is based on the file BCI-DNI_brain.nii.gz, so its basename would be BCI-DNI_brain.
- If necessary, modify the volumetric label file (subbasename.svreg.label.nii.gz) using the BrainSuite Label Painter tooland save your modified labels in the same directory using the same file name (subbasename.svreg.label.nii.gz). svreg_make_atlas reads the subbasename.svreg.label.nii.gz file to label BrainSuite surfaces.
- If you create new ROIs, save your modified label description file as brainsuite_labeldescription.xml in the same directory.
The brainsuite_labeldescription.xml file is used to read color codes to color the labels on the surface and is also used to provide text descriptions of regions of interest in the BrainSuite GUI and other programs. If your volumetric label file uses an ROI identifier that is not found in the xml file, then a default color will be assigned. - A video tutorial on this process is provided here.
Run svreg_make_atlas
To create a new atlas, the svreg_make_atlas program requires two arguments: subbasename and atlasbasename.
- subbasename is the full path and file prefix of your new atlas.
for example if your nifti file is C:\Users\BrainSuiteUser\Documents\CustomAtlas\subj1.nii.gz then your subbasename would be C:\Users\BrainSuiteUser\Documents\CustomAtlas\subj1 - atlasbasename is the full path and file prefix of the atlas directory that was used to initially run SVReg.
for example: C:\Program Files\BrainSuite16a1\svreg\BCI-DNI_brain_atlas\BCI-DNI_brain
svreg_make_atlas command usage
Windows:
Mac/Linux:
Inputs
subbasename: File prefix of the subject that you want to convert into atlas.
atlasbasename: Atlas from SVReg that was used to process this subject.
-E: Use this flag if volumetric labels were manually edited.
Example Usage
This example assumes that the new atlas files are located in ~/Documents/CustomAtlas/ (Mac/Linux) or C:\Users\BrainSuiteUser\Documents\CustomAtlas\ (Windows). The base MRI file for the atlas is assumed to be subj1.nii.gz, and the atlas is assumed to have been initially registered and labeled using the BCI-DNI_brain_atlas.
- Open a command terminal
- Navigate to the SVReg bin directory by typing the following command in the terminal:
Windowscd C:\Program Files\BrainSuite16a1\svreg\binMac
cd /Applications/BrainSuite16a1/svreg/binLinux
cd /opt/BrainSuite16a1/svreg/binnote: The BrainSuite directory may vary depending on where BrainSuite was installed.
- Run the svreg_make_atlas module as follows:
Windowssvreg_make_atlas.exe C:\Users\BrainSuiteUser\Documents\CustomAtlas\subj1 C:\Program Files\BrainSuite16a1\svreg\BCI-DNI_brain_atlas\BCI-DNI_brain -EMac/Linux
./svreg_make_atlas.sh ~/Documents/CustomAtlas/subj1 /Applications/BrainSuite16a1/svreg/BCI-DNI_brain_atlas/BCI-DNI_brain -E - Move the new atlas folder to the SVReg directory and modify the SVReg manifest to include your new atlas (see below).
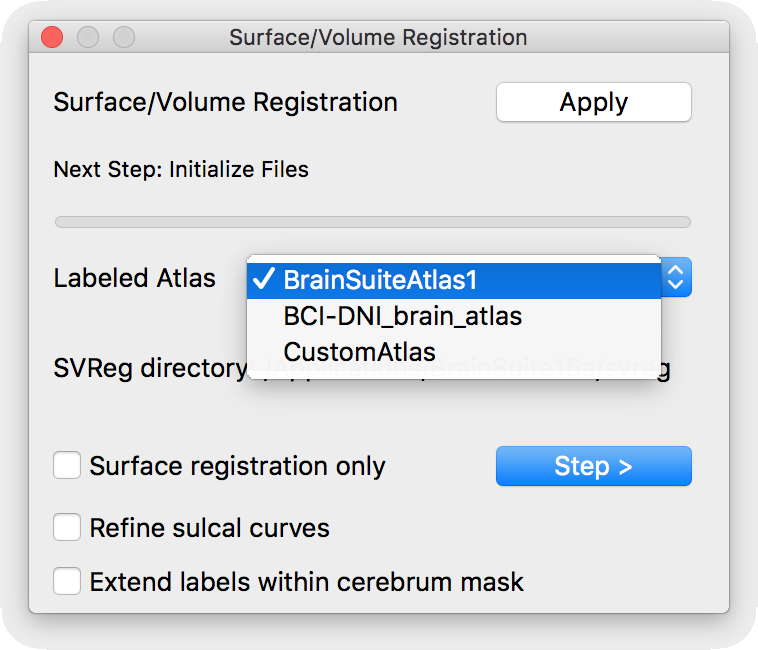
Using Your Custom Atlas
- Once your custom atlas has been created, move the new atlas folder into the SVReg directory.
Windows: C:\Program Files\BrainSuite16a1\svreg\<new_atlas_name>
Mac: /Applications/BrainSuite16a1/svreg/<new_atlas_name>
Linux: /opt/svreg/<new_atlas_name> - Edit the SVReg manifest file, svregmanifest.xml, to add your new atlas. This will enable the BrainSuite GUI to find it. The file currently contains entries for two atlases:
<atlas>BrainSuiteAtlas1</atlas>
<atlas basename=”BCI-DNI_brain”>BCI-DNI_brain_atlas</atlas>Add an entry for your new atlas, e.g., for the CustomAtlas example above, the modified atlas section would be:
<atlas>BrainSuiteAtlas1</atlas>
<atlas basename=”BCI-DNI_brain”>BCI-DNI_brain_atlas</atlas>
<atlas basename=”subj1″>CustomAtlas</atlas> - GUI Usage: The next time the BrainSuite GUI is loaded, the new atlas should appear in the SVReg dialog box.
- Command line: Custom atlases can be used for co-registration using SVReg by running SVReg from a command line. Instructions of running SVReg from a command line can be found here.